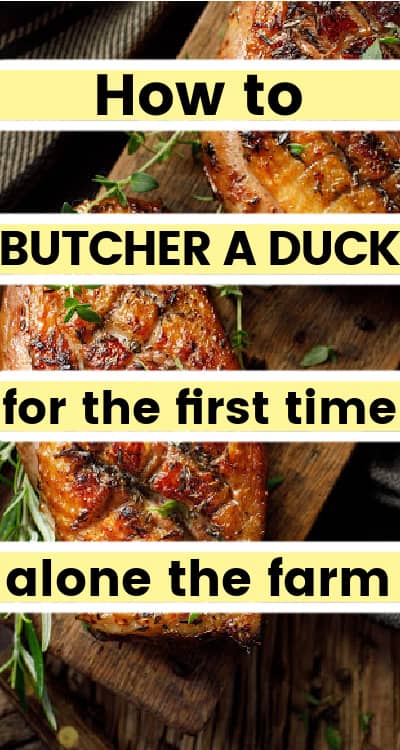
How to butcher a duck for the first time: Step-by-step guide
I’m going to tell you how to butcher a duck for the first time alone on the farm because taking a life is not easy. When I decided to embark on this wild journey, I both knew that there would be life and death, I just didn’t know how much.
Eventually, I found it was hard to have to decide when death happens – like having to decide when a duck’s time is up. I had my own ducks for years, and I butchered them alone. You can, too.
Table of contents
A detailed guide to butchering a duck for the first time ever and alone on the farm.
The hardest part, in the beginning, wasn’t being able to always decide when death happened. Part of becoming a homesteader and furthering your life towards self-sustainability is often culling your livestock. You’re capable of doing it and I’m going to walk you through it, step by step.
It’s important to preface this experience by saying there are so many different ways to cull an animal. Your preferred method might not be mine. But in the face of quality control, it is always smart to do your research, even if it takes a long time (speaking from experience on that one). Last year, I watched my first free range sheep and cow be butchered. I can confidently say I would not be able to do it on my own, and it wouldn’t be a good idea to even try.

Reasons to butcher a duck
The main reasons I was forced to butcher a duck for the first time was not pleasant. We had three drakes that singled out the fourth drake and would attack him. They eventually singled out a hen and were plucking her feathers to the point of bloodshed and culling ducks came into the realm of possibility.
Our hens also stopped laying eggs so I separated the 3 drakes and just knew that eventually, they would have to be dinner.
Well, I got away with putting it off for months until finally, I realized I was doing them a disservice by separating them.
Duck jail ain’t no fun, friends, and I needed to learn how to process a duck at home, alone.
Alternatively, you might think duck meat is a delicious meat but can hardly find them in the grocery stores, or don’t want to pay the additional cost for a specialty meat. Most commonly you might be able to find duck breasts, but if you can’t do that and don’t have a local breeder then raising your own is the next best thing.
How I prepared mentally
I mentally prepared myself for a few days, went and bought a hatchet, sharpened my poultry sheers, watched too many YouTube videos and I did it. Thinking about how to kill a duck for the first time is quite a daunting task, and I wanted to figure out the best way and the most basic steps so I didn’t have a hard time.
I was culling ducks two days ago and I did it all by myself. I think most homesteaders would agree with me that taking the life of an animal is the hardest part. Butchering time is the hardest part, no matter what time of year it is.
After that, you just have to make sure you don’t poke any innards that might spoil your meat. I won’t lie… I was scared and nervous and felt slightly guilty. But all in all, I did very well.
I culled my first duck in 30 minutes from plucking to cleaning and I did not poke any innards. We now have two ducks in the freezer ready for the table and boy howdy that is a good feeling to know where that meat was and how it was raised!
I’ll explain the process I used to “do the deed” (how to slaughter a duck) below so if you would rather not read about the culling of an animal, I’m giving you an out!
When to butcher a duck
Meat ducks are typically at butcher age when you can’t feel pin feathers anymore and when their “flight” feathers are fully developed. This can be anywhere from 8 or 12 weeks of age, some duck breeds up to 20 weeks. Younger ducks have more downy feathers or soft feathers.
The older your duck gets, the more difficult the whole bird will be to pluck, often resulting in skinning a duck that’s older instead of plucking. In this case, most people start around the ribcage and harvest just the breast of the duck meat. This can be a wasteful method for many reasons.
When skinning a duck, you’re losing the skin and fat that many people want when raising ducks for meat. By butchering your ducks closer to the ideal age according to your breed, they’ll be easier to pluck and you’ll reap the benefits of the skin because you won’t need to skin them.
Please note
Our animals live the happiest lives they can live before their time comes. When they reach their last day, we strive to ensure their final moments aren’t horror and pain. That is our mission: to raise happy, humane food for ourselves and our future children, including vegetables, fruit, herbs, and meat.

How to cull a duck (all alone)
Items you will need:
- A sharp knife of your choice (the best one is one that feels comfortable in your hands)
- A bucket for hot water, or scald water
- A bucket for cold water
- A cutting board
Preparation before butchering a duck
- First I boiled a pot of water. This is optional, but if you didn’t already know, you can dunk your whole duck after you kill it to loosen the feathers, especially the wing feathers, for plucking. Be sure the water is around 153˚ and don’t leave the bird in the pot for too long or you’ll start scorching the fat. We don’t want that.
- Prepare your station. I got 3 bowls: One for the innards I fed my dog, one for the parts I didn’t feed to my dog, and one for a water/bleach mixture. I use the water/bleach mixture to dunk my hands if they are nasty or need to be disinfected, along with my knives/sheers.
- BE SURE TO SHARPEN ALL UTENSILS BEING USED! This is SO EXTREMELY IMPORTANT! Take it from someone who has not properly sharpened their tools first – it will change EVERYTHING.
- Have two buckets nearby. One to drain the bird after decapitation (we’re talking blood) and another to throw feathers, head, etc. in. If you’re doing multiple birds, you’ll also want a cooler of ice to place the finished birds as you move on to the next so your duck meat doesn’t spoil.
- Get an empty feed bag and cut a hole in one of the corners, just large enough for your duck head and neck to be in. I read about this way somewhere because it makes it easier to contain the bird. It also seems to help calm the bird and gives you some promise for a clean cut. (which is good for first the bird and also for you). A common method is to use a kill cone. If that works for you, then carry on. It wasn’t how I decided to do things, but maybe next year I’ll try something new.
- OPTIONAL: Turn on music. It’s my way of staying calm so that I don’t give negative, scared, uptight energy to my already mad-at-me-for-touching-it bird.
Step-by-step directions for how to butcher a duck
- CATCH YOUR BIRD – BE SURE YOU DO SO IN THE NICEST WAY POSSIBLE! That is what the animal deserves and you can bruise the meat. You’ll notice bruising if you find dark meat where dark meat shouldn’t be.
- Slide your bird into the bag as gently as you can, guiding its head through the hole. I suggest holding your bird for a moment, giving him/her the chance to calm down. After all, how would you like being shoved into a bag?
- SO NOW IS THE HARD PART: Lay your bird down on its stomach. (I have a setup where I have two nails with a tie-on one end. The ducks head goes in between those two nails. I LIGHTLY place the tie over the neck so that I can properly aim.)
- Hold the body of your bagged bird and swing your hatchet/ax down as hard and accurately as you can. Some folks use a killing cone, and that’s completely acceptable if it works for you. I did not feel confident with that method, but you might!
Note: All major arteries must be severed. You are aiming to completely cut the jugular veins and carotid arteries so your duck adequately bleeds out. Failing to cut all arteries can extend the time your animal has to die, and the pain he/she experiences. - Quickly discard the head and flip the bird upside down into the bucket to bleed out. If you miss or don’t get a clean cut, quickly swing again. Don’t wait or wonder why you’ve decided to do this alone. The duck needs you now more than ever. Don’t let the duck suffer.
- OKAY. NOW THAT THE HARD PART IS DONE. Bring your bird to the pot of hot water and dunk it just for a minute. Older birds may need slightly longer, but be careful not to cook your bird before you’ve even plucked it. Plucking the bird is a pain in the rear but do the best you can. If you have to dry pluck, remember that “This, too, shall pass”.
- Place feathers in the discard bucket, rinse your duck and transfer the bird to the butcher table. Start by cutting the wings and legs at the joints. and place them in the discard bucket
- Place the duck on the stomach and make a cut right above the tail. Carefully cut around to the belly of the bird, being sure not to slice too deep and cut open the intestines and whatnot. Do not ever poke with your knife. Pinch the skin and GENTLY slice. OR you can carefully use your poultry sheers
- When you’ve cut through the fat/skin of the bird, slightly slip your fingers in and open the bird up. Then, once you can see the insides, make a small cut up the belly (maybe an inch), tip the bird over your bowl, and pull out the innards. This is really weird and gross the first (and second, and third…) time you do it but you’ve come this far so don’t stop now.
- YOU CAN KEEP the lungs, kidneys, heart, spleen, liver, small intestine, large intestine, and bladder to feed to your pup or your chickens. Excess fat can be utilized in the kitchen in many ways. Duck fat is expensive at the store, so make sure you don’t toss extra fat out!
- NOW THAT THAT IS DONE WITH. Make sure everything is out of your bird. Rinse, check, repeat. All innards need to be outwards now. Pull or cut out the neck and throat, pull out any feathers you missed, rinse one last time and place your bird in the cooler or bucket of ice. Now would be the best time to take carcass weights, also, to monitor quick growth at the ducks’ age. You might find the best age to butcher a duck is different than the standard age.
- Transfer the innards you choose to discard to your discard bucket and start on your next bird, if there is one. If not, start cleaning up!
You can quarter the duck after it has “rested” and rigor mortis has kicked in fully come and gone, allowing the meat to “relax”. You mainly hear about people enjoying breast meat, buck duck legs, wing tips and the meat around the rib cage is all delicious. If you’re slow cooking your duck, watch for small bones!
To preserve your duck, make sure it is wrapped well and place in the freezer. Plastic wrap, butcher paper (often coated with paraffin wax) or a food saver (I’ve had this one for years and love it!) can all do the trick. It’s fair to note that I try not to use any extra plastic products than are necessary and, with that being said, if you plan to freeze meat for more than 6 months you might consider a tightly wrapped plastic to avoid freezer burn.

Common breeds of duck
If you’re into raising duck just for the duck eggs, you aren’t alone. If you’re not familiar with duck eggs, they’re higher in crude protein than chicken eggs and are the best for baking, yielding a fluffy and delicious product. Plenty of small-scale (and large-scale!) homesteaders raise ducks as a source of meat.
I raised Welsh Harlequin ducks and, admittedly, always waited a little too long to butcher so the meat was more tough than I would have liked. Additionally, I’m not a big duck meat person so I never raised ducks again. If you love duck meat, one of the breeds below could be a great addition to your back yard homestead.
Do you research, taking your geographic location and budget into consideration, and then always try to find a local livestock dealer first so you can check the living conditions of the animals. If you are in an area where buying local livestock is not an option, there are a few reputable hatcheries online that will provide healthy animals.
Pekin
The most popular meat duck, Pekin ducks have beautiful white feathers with orange legs. Drakes (male ducks) can grow to be 9 lbs while the hen (female duck) get up to 8 lbs. Though some ducks do fly, Pekin’s can not since they are so large.
The Grimaud hybrid pekin is the most commonly used in commercial settings, from my research. In addition to a great source of meat, Pekins provide anywhere from 150-200 eggs per year.
Muscovy
You might have seen Muscovy ducks at the park. Native to the Rio Grande Valley of Texas, this flight-capable white, red and black duck is considered invasive in Florida! Muscovy ducks are very large ducks, with the drakes reaching up to 15 lbs and the hens up to 8 lbs.
With red meat described at times as “gamey” but tender, these birds are a popular duck in Europe with thin skin and low fat content. Honestly, after doing some research I learned that Muscovy Ducks are pretty interesting! These large ducks lay around 180 eggs a year, and take a little longer to hatch than other poultry at 33-35 days.
Silver Appleyards
IF I ever decided to raise ducks again, I might raise Appleyards! Another large-ish duck (averaging 8-9 lbs), these ducks are some of the prettiest. Like the Welsh Harlequin ducks I used to raise, they are on the livestock conservancy list. Their appearance presents more yellow hues, a black-tipped tail and a black mohawk.
Active foragers and calm temperaments, these heirloom ducks are a great dual-purpose duck to raise beside your broiler chickens. They’ll provide over 200 large, white eggs per year for all the duck-raising bakers!
Conclusion: How to cull a duck (all alone)
You’re done. Great job! You did it! We did it! We’re becoming homesteaders! One day we’ll feed our families the most delicious food from our yards and life will be as life should be and death will be there, too.
But life is always the bigger picture, Y’all! Now I know I will get better at this process, as will you. If you have any suggestions for me, I’ll take them gratefully!
Why discard the wings and legs?? Those are my favorite parts of a chicken so I don’t know why they wouldn’t taste good from a duck??
Sometimes there are things we just need to do and get done. I think it’s more of a disservice to ourselves and our kids to NOT kill and clean our own food sometimes. I had to work up to culling birds, and I’m surprised I didn’t do it sooner because the drake I had back then a few yrs ago killed my precious 4 week old hand raised/hatched heirloom gosling (by drowning it in the water bowl trying to mate with her) and shed imprinted on us strongly…. But I just got rid of the loud obnoxious fkock stressing pekin drake bc I just want layer ducks anyway. Was not easy.
Meant to say also: this kind of a post is good because society kind of has a way of surrounding you with ads and already killed and clean meat such that we aren’t even thinking of what we’re eating as having been alive and walking around at one time.. for many of us who weren’t raised on a farm or anything like that it’s hard to know where to start even .. technical of course but even more with the more sensitive aspects as you delve into here. Perhaps with the respect that comes from harvesting our own will come greater respect for the meat and environment itself…. Because meat is not something sustainable if eaten constantly, and diy harvest and rearing makes that point pretty obvious.
Your line, “life will be as life should be and death will be there, too,” has helped me change my entire perspective on our homestead. I’ve now butchered my first three ducks, alone, and will be regularly raising chickens for meat in the future. Thank you for so eloquently putting such a difficult concept.
“The innards should now be outwards.”
That line cracked me up!!
First time duck butcherer here, thank you for the easy to understand instructions!!
Hi Callie! I’m so glad I could give you a laugh and also help you navigate butchering a duck for the first time! I’m 4 years into homesteading and I still watch Youtube videos and read instructions before butchering animals. Best of luck to you! I bet you’ll do GREAT!
I’m preparing to do this for my small Pekin flock. I’ve got a 1:1 ratio of drakes to hens and it isn’t working out for one of the hens. Do I need to purchase a flaying knife? Or will the shears and hatchet be enough?
Hi Joshua! Sorry to hear about your hen. I would suggest using a knife in addition to the shears and hatchet. The hatchet will just be to dispatch the duck. You’ll find that the shears won’t always be 100% convenient when cleaning and dressing. You probably even have a knife in your kitchen that would work this once. I would say to check your kitchen before buying anything. When we started butchering on our homestead I used some fish filet knives I had on hand. I hope that helps! Good luck!
We too killed two of our birds (chickens) in our own backyard. We happened to be living in a subdivision at the time…if only the neighbors knew what was going on that day. Yikes! It was definitely a learning experience but I’m so glad that we did it. It feels good to know where your food is coming from. I’m not sure I could have (mentally) done it all by myself the first time, though. GOOD FOR YOU! Glad I found your blog. Keep up the good work!
I recently culled a rooster and it didn’t go as well. Culling is definitely the hardest part of homesteading for me, especially since I didn’t grow up around it. I had to take about 4 days to mentally prepare! And, I agree! It really does feel great to know where your food is coming from. If you subscribe to my mailing list, I send two emails a month and I include more of the personal, real-time things that are happening here on my homestead. I’m glad you found my blog, too, and I look forward to hearing from you again!